Effective journaling on your blog
How to document your learning in markdown
Prerequisites
- If you haven’t create a Jekyll blog page on Github yet, please follow this tutorial to create your own free website.
- If you don’t have a code editor yet, you won’t make a mistake by picking VS Code. Download and install the version that is right for your operating system.
- If you haven’t installed Git yet, install it on Mac OS, Windows or Linux.
- Now you can clone your Github repo and edit it in VS Code.
Create a post
To make sure that your Jekyll blog treats your file as post, you need to follow the three conventions summarized under the right place, the right name, the right header.
The right place
After opening your repository folder in VSCode, you will see the following file structure on the left side of your screen:
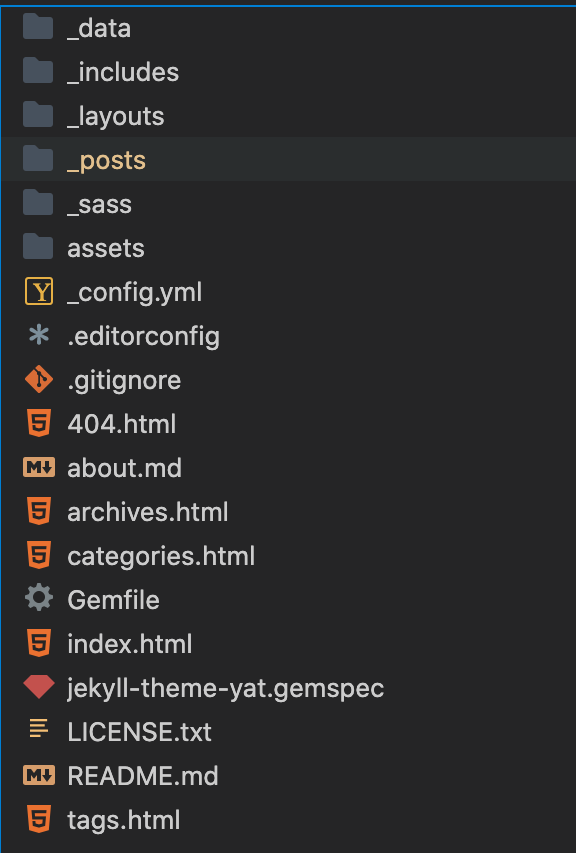
To create a new post, open the _posts folder and create a new file.
The right name
For your jekyll blog to recognize the new file as a blog post, it does not only have to be inside of the _posts folder, it also needs to follow the right naming convention:
year-month-day-filename.md
The file you are currently looking at is called
2022-02-12-document-your-learnings.md
The right header
Now that you named your file, you can open and edit it. As your first edit, you should pass the right header information. You can just copy and paste the following header (this is the header used in the post you’re currently reading) to the top of your article and customize the values to your needs.
---
layout: post
title: Effective journaling on your blog
subtitle: How to document your learning in markdown
categories: Markdown
tags: [Markdown, journaling, blog]
---
Quick explanation of the attributes:
layout: defines which layout will be applied to this file when being rendered. This needs to be set to posttitle: displayed on links to your post and on top of your post’s pagesubtitle: displayed underneath your title on the post’s pagecategories: used for the categories page of your site and your posts url; if you want to use multiple categories, you can put the collection into square brackets; order matters here (going from higher to lower categories from left to right)tags: used on the tags page of your site for the purpose of filtering; put the tags that are relevant to your post into square brackets and separate them by commas
The actual content of the post goes below the header (note that the header is delineated by --- at the top and the bottom as can be seen above).
Useful items
Here are some practices that work well for note taking.
Headings
If you created your blog by following this tutorial, you’re dealing with a site that automatically creates a table of content for each of your posts based on the structure of the headings within your post. This makes navigating the content really easy for your readers. You should keep that in mind when crafting your post, because eventually this will be your go-to resource once you want to make use of the knowledge documented here.
The syntax for headings in Markdown is straight forward. # in front of some text turns it into a level 1 heading. ## turns it into a level 2 heading, ### into a level 3 heading, etc.
Pair of ```
Backticks in Markdown make it possible to format code. The following statement
```Python

print("hello world!")

```
will be formatted as
print("hello world!")
You can also use the three backticks without specifying the programming language.
```
print("hello world!")
```
In this case, the block between the backticks will still be treated as a code block, but it is agnostic with regard to interpreting the layout.
print("hello world!")
Pair of `
While three backticks are demarcate a code block, one backtick can be used to highlight something as seen here. This is useful for explanations as you can see in the explanation of the header of a post article above. To highlight a segment, just put it between single backticks like here:
`highlighted`
highlighted
Bold, italic
This is **bold**, this is *italic*, and this is ***bold and italic***.
This is bold, this is italic, and this is bold and italic.
Text segment
> Use > to highlight a text segment
Use > to highlight a text segment
Links
To insert a link, you put the [text to click on into square brackets](https://tea-berlin.github.io/) and the url into normal brackets.
To insert a link, you put the text to click on into square brackets and the url into normal brackets.
Images
Images follow the same syntax as text, but with an explanation mark in front of the square brackets.


Bullet points
And of course, you can use bullet points:
- just use the minus sign
- you can even distinguish levels through indents
    - second level, you see?
- just use the minus sign
- you can even distinguish levels through indents
- second level, you see?
Numbered lists
The same holds for numbered lists:
1. This is the first point
2. This is the second point
    1. This is the first point under the second point
- This is the first point
- This is the second point
- This is the first point under the second point
Push to Github
Once you have made the changes you want to commit to your website, open a terminal. If you are in VSCode, you can do that by clicking on Terminal > New Terminal at the top of your screen. Now a terminal will open at the bottom of your screen (it might have been opened already).
Being in your projects root repository, you can now compare the state of the repository on your computer with the state of the repo that is available online, by typing:
git status
If no change shows up, you might have forgotten to save your file/changes.
To add all the modified or new files to the staging area, type:
git add .
The .signals that you want to stage all changes. You can also select individual changes by passing concrete file names instead.
Now, commit your changes providing a brief description.
git commit -m "this is a note to myself and others dealing with the repository; it describes my changes"
Now it is time to push the changes to your remote repository.
git push origin main
Done! Congratulations!